
I understand the syntactic application of generics as a language feature, but Ole Begemann’s post on protocols convinced me there’s still a lot of gold to be mined in their conceptual underpinnings.
Towards that, I’ve found these two papers particularly enlightening:
An example chunk of wisdom from Fundamentals (lightly edited for conformance with Swift syntax):
The critical insight which produced generic programming is that highly reusable components must be programmed assuming a minimal collection of [protocols], and that the [protocols] used must match as wide a variety of concrete program structures as possible.
Thus, successful production of a generic component is not simply a matter of identifying the minimal requirements of an arbitrary type or algorithm – it requires identifying the common requirements of a broad collection of similar components.
1: Presented at the “First International Joint Conference of the International Symposium on Symbolic and Algebraic Computations and Applied Algebra, Algebraic Algorithms, and Error Correcting Codes”. Ladies and gentlemen, that is how you name a goddamned conference! ↩︎
Three quick tips before the new year.
Everyone else has probably arrived at this already, but Swift 3’s rejiggering of the where clause affects more than guard’s syntax. It also eliminates the need for && operators in ifs:
// Equivalent in Swift 3:
if this && that { ... }
if this, that { ... }
This clearly isn’t a big deal when evaluating two simple Bools. But when working with expressions (especially those involving other logical operators), we have to consider things like grouping and order of operations and I usually give up and put parentheses around everything just to be safe:
// Maybe a regex or something?
if (x > y) && (xyzzy(q) || q != 0) { ... }

// Two expressions, no operator ambiguity.
if x > y, xyzzy(q) || q != 0 { ... }
This syntax also has the knock-on benefit of making it clear where to break lines.1
// Use operator to end lines?
if this &&
   that &&
   theOther {
  //...
}

// Or begin the new lines?
if this
&& that
&& theOther {
  //...
}

// Nevermind.
if this,
   that,
   theOther {
  //...
}
Swift’s module-based approach to implicit namespacing works great most of the time. Even if I do something daft like implement my own String type:
// In MyModule:
public struct String { ... }
I can use module names to disambiguate what would otherwise be a collision with the standard library:
import MyModule

let myString = MyModule.String("foo")
let swiftString = Swift.String("foo")
But, what if MyModule exports a public type also named MyModule?
// In MyModule:
public struct String { ... }
public struct MyModule { ... }
Oops! Now, when we import MyModule, it binds the symbol MyModule to our struct, not the module. Swift now thinks we’re asking our struct for a member called String which, of course, doesn’t exist:
import MyModule

let myString = MyModule.String("foo")
//> Value of type 'MyModule' has no member 'String'
Even if we’re careful not to clobber the stdlib, there’s no telling what types other 3rd party modules (or future versions of Swift) might introduce. Collisions are inevitable. Best to plan for them ahead of time by not doubling up on module and type names.
Unfortunately, naming our Swift modules after their primary class seems to be something of a(n anti-)pattern in the community. Here’s a quick hack for when we need to work around collisions between modules with non-distinct names:
typealias for it.So if we have two modules, Foo and Bar, both of which declare a type Thing (and another type with the same name as the module, preventing standard disambiguation), we could:
// In "FooTypes.swift"
import Foo
typealias FooThing = Thing
// In "BarTypes.swift"
import Bar
typealias BarThing = Thing
// In "MyWidget.swift"
import Foo
import Bar
//Use aliases instead of Foo.Thing and Bar.Thing
let thing: FooThing = BarThing().someValue
Out with the old, in with the new. Everyone have a safe and productive 2017!
1: Yes. This is a real argument I’ve had. More than once.↩︎
Spend enough time reading evolution, and these observations will start to sound pretty familiar…
via Michael Tsai
This week, Ole Begemann talks about introducing an operator to aid interpolating optionals. Which is cool, but then he drops this tidbit:
The
@autoclosureconstruct ensures that the right operand is only evaluated when needed, i.e. when the optional is nil.
I’d never thought of using @autoclosure to enforce this sort of “short circuit” behavior before. Very clever!
Ole Begemann writes:
In the shorthand syntax, raw values can only be
String,Character, or any integer or floating-point number type … TheRawRepresentableprotocol has no such limitation.
Often times (especially when writing recursive functions) we want to take an array and split it into its first and remaining elements. The most obvious way of doing this in Swift is pretty clunky:
//Ugly!
func loop(_ c: [Int]) {
  guard !c.isEmpty else {
    return
  }
  var rest = c
  let first = rest.removeFirst()

  print(first)
  loop(rest)
}
I hate pretty much everything about this.
First, removeFirst() requires we make sure the array isn’t empty. But it’s non-obvious we’re supposed to care about that. In fact, we probably shouldn’t care. We want to focus on first, but our code is forcing us to think about the mechanism we’re using to retrieve it instead.
Then there’s the assignment of c to rest just to make it mutable. And the fact that rest is named “rest” even though, initially, it contains the entire array. It’s not clear at all that removeFirst() returns the value it removes, so the value of first is something of a mystery. And, when all is finally said and done, rest is mutable even though it has no reason to be.
All and all, it feels too verbose, and way too imperative. Nothing apart from the names first and rest give any hint about what’s going on here. Thankfully, there’s another way to skin this cat:
//Pretty!
func loop(_ c: [Int]) {
  let (first, rest) = (c.first, c.dropFirst())
  guard let someFirst = first else {
    return
  }

  print(someFirst)
  loop(Array(rest))
}
This is better on a number of levels. Nothing is ever mutable, for one. And c can now be empty making first optional — which lets us focus on our value and its existence rather than implementation details of our array. And first and dropFirst() are straight-forward in their naming and behavior.1
There’s only one thing still sticking in my craw. first is used for one hot minute before being superseded by the the unwrapped someFirst. Depending on our sensibilities, this might be something the nascent “unwrap” proposal could help with. In the meantime, though, it looks like a job for case:2
//Concise!
func loop(_ c: [Int]) {
 guard case
       let(first?, rest) = (c.first, c.dropFirst())
       else {
   return
 }

 print(first)
 loop(Array(rest))
}
And there we go! Clear, concise assignment through tuples and just-in-time binding thanks to case.
Back when we left ObjC, many of us asked ourselves, “How much more expressive can Swift really be?” My answer is, “Very; and increasingly so.”
1: Well, almost. Note that dropFirst() returns an ArraySlice. Because loop expects an Array, we have to convert rest before passing it to loop(). Reworking loop() to take a generic Collection would get around this — at the expense of being less blog-friendly.↩︎
2: For those unclear on the work first? is doing here, this post on optional pattern matching covers the basics.↩︎
Great thinking over at Khanlou.com about types that implement isEmpty and the weird tri-state they can be in if Optional. I also have a self-imposed rule forbidding optional Arrays and Dictionarys.
I should probably extend this practice to Strings, but treating "" different from " " gives me the heeby jeebies. So I have a maybeBlank()->String? extension on String that returns the string or nil if it’s empty or whitespace.
This article really calls out how insane that is.
Ole Begemann dives deep on How to Read the Swift Standard Library. Turns out it’s easiest to just build the thing from source. Thankfully he walks us through the process.
As with all dependencies, we should reduce UserDefaults to an abstract protocol, inject it into the classes that require it, and thereby decouple ourselves from implementation details and increase the testability of our code by introducing seams.
But I’ll be honest, the UserDefaults API is so simple and pervasive that standard dependency management feels like overkill. I always end up calling it directly from my code. Perhaps you do the same?
If so, we’ve probably encountered the same problem: without the ability to inject mocks, testing code that makes use of UserDefaults can be a pain. Any time we use our test device (including running tests on it!) we potentially change the state of its persisted settings.
So all our tests have to initialize settings to some known state before running. Which introduces a lot of ugly boilerplate and makes it difficult for us to test uninitialized “default” states.
Thankfully, UserDefaults is pretty flexible and we can code our way out of this hole.
UserDefaults is built around five1 conceptual “domains”:
Each domain can hold any number of keys and values. If two or more domains have values for the same key, the value of the higher domain overrides values of the lower ones.
We’re probably all familiar with this concept in the context of the registration and persistent domains. The registration domain holds the “default” values we set up using register(defaults:) on app launch. The persistent domain holds the user values we persist using set(_:forKey:).2 And we know that if we register a default then persist a value from the user, it’s the persisted value we’ll get back from UserDefaults.
But the defaults we registered are still there in the registration domain. If we could somehow peel back the persistent domain, we could test from the “base state” of our app without any of the goofy stuff that might have been persisted by other tests or users.
UserDefaults has a mechanism for this: setPersistentDomain(_:forName:). The documentation helpfully states that “name” here “should be equal to your application’s bundle identifier.” So clearing out our UserDefaults is as simple putting something like this in our setUp():
override func setUp() {
  let bundle = Bundle.main
  let defaults = UserDefaults.standard
  guard let name = bundle.bundleIdentifier else {
      fatalError( ... )
  }
  defaults.setPersistentDomain([:], forName: name)
}
And this works. But two problems. First, it blows away the persisted preferences of our app. If we’re running tests on our carry device, it can be a pain to have our app reset every time we test.
Second, I personally hate having setUp() and tearDown() methods in my tests. Code in setUp() feels so far removed from where it’s actually used, and most of my tests require some amount custom setup that can’t be reduced to a single function anyway.
So here’s what I use instead. I’ve been very happy with it:
extension UserDefaults {
  let bundle = Bundle.main
  let defs = UserDefaults.standard
  static func blankDefaultsWhile(handler:()->Void){
    guard let name = bundle.bundleIdentifier else {
      fatalError("Couldn't find bundle ID.")
    }
    let old = defs.persistentDomain(forName: name)
    defer {
      defs.setPersistentDomain( old ?? [:],
                                forName: name)
    }

    defs.removePersistentDomain(forName: name)
    handler()
  }
}
Then my tests look something like:
class MyTests: XCTestCase {
  func testThing() {
    // Defaults can be full of junk.
    UserDefaults.blankDefaultsWhile {
      // Some tests that expect clean defaults.
      // They can also scribble all over defaults
      // with test-specific values.
    }
    // Defaults are back to their pre-test state.
  }
}
Remember, as of Swift 3 closures are non-escaping by default. So blankDefaultsWhile’s trailing closure doesn’t need a @noescape to avoid the self tax.
1: There’s actually a sixth “Host Domain” that scopes preferences to host name. But this is (even more) rarely used, and only accessible through Core Foundation.↩︎
2: As for the rest, the global domain holds system-wide preferences for all apps. The argument domain holds preferences we pass when launching apps from the command line (or via “Arguments Passed on Launch” in our Xcode project’s scheme). The volatile domain is more or less equivalent to the persistent domain, except its values don’t get saved to disk, and are thus lost every time an app is quit.↩︎
In graphic design, a “hairline” is a line drawn with the thinnest stroke possible on a given output device. If we’re drawing with Sharpies and a ruler, our hairlines will be comparatively thick. If we’re printing on LaserJets, they’ll be pretty darn thin.
On iOS devices, hairlines should be exactly one pixel wide. But iOS doesn’t let us draw in pixels, it asks us to draw in points. And points don’t uniformly convert to pixels across all platforms. And even if they did, Core Graphics’s coordinate system lines up on the boundaries between pixels, not the pixels themselves. So getting hairlines right can be a little tricky.
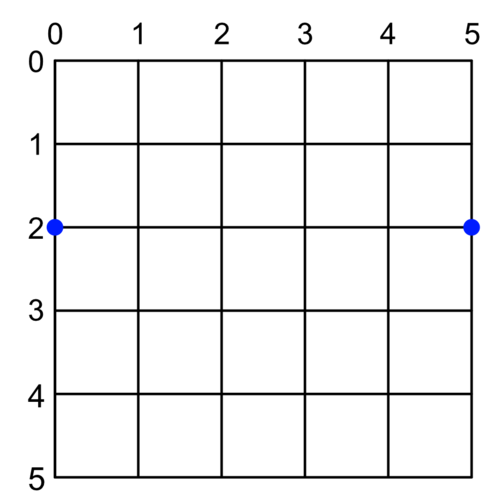
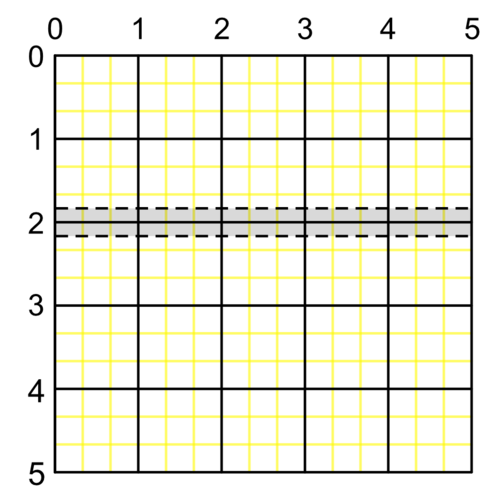
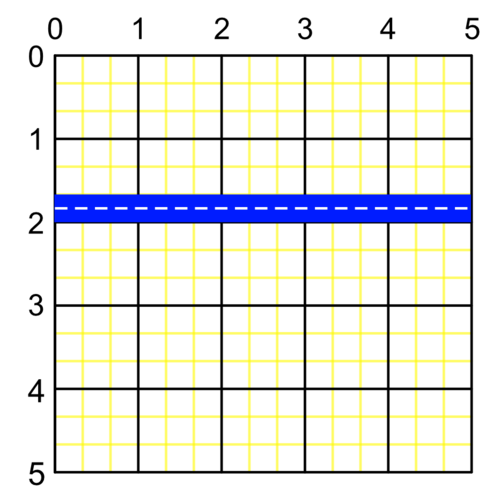
Check out the following 5x5 point grid. Let’s say we want to draw a 1-point thick line between the two blue dots — that is, between (0,2) and (5,2).
We might expect something like:
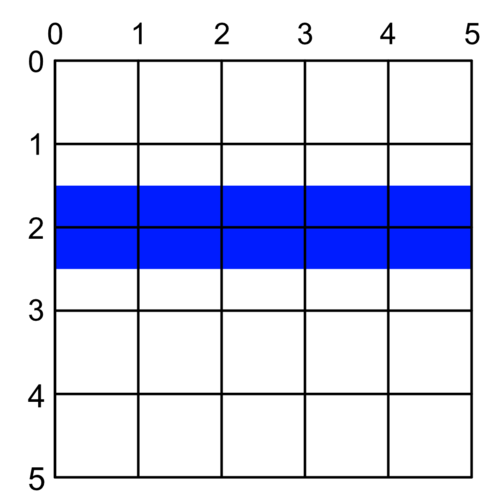
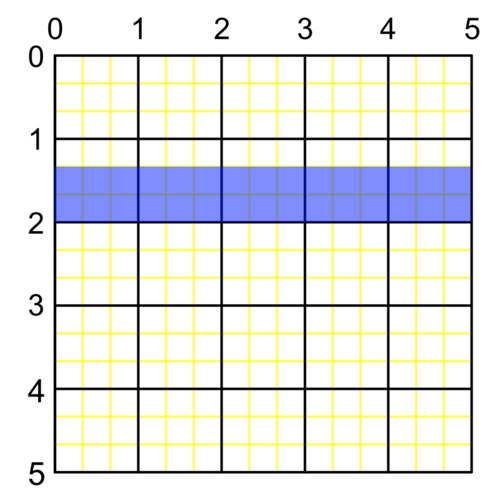
But what we’ll actually get (assuming, for the moment, that pixels and points are equivalent) is:

What happened?
It turns out our coordinate system (the black lines in our image) traces the space between points, not the points themselves. So by drawing right along the path at Y = 2, we’re asking for a line to be drawn between points.
That works just fine, mathematically. But in the physical world, our line will be represented by square pixels that are either on or off. Anything “in between” is gets averaged out with anti-aliasing. So instead of a 1-point blue line, we get a 2-point half-blue line.
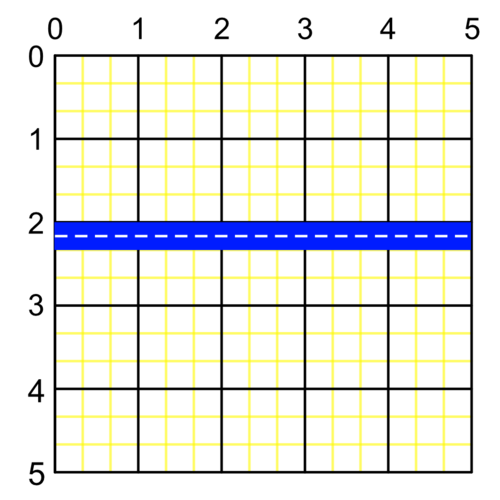
If we want our perfect thin blue line, we have to draw it down the middle of a point, not in-between. For example, where Y = 1.5 or Y = 2.5:

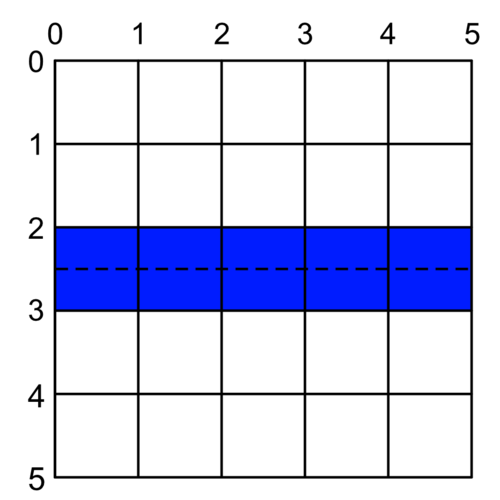
More generally, to have a perfect line, we have to either round up or round down to the nearest mid-point between grid lines.
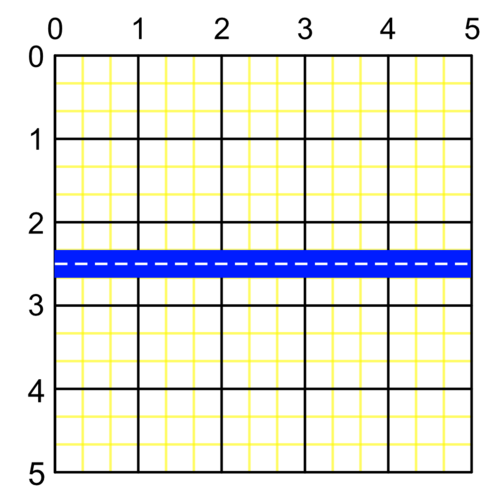
Or, graphically, for any Y in the shaded area, we need to either round it up to the top dashed line or round it down to the bottom dashed line to draw a perfect non-antialiased line:

How do we choose if we want to draw above or below our given coordinate? It depends on the situation. If we’re trying to draw a line at the very top of a clipping view, we’ll want to draw slightly below the Y we give it. Otherwise it will clip and not be visible. The same goes in reverse for drawing at the bottom of a view.
If we call this preference to draw above or below our point the line’s bias we can create a function that draws perfect 1-point-wide lines like so:
func singlePointLine(at y: CGFloat,
                     in rect: CGRect,
                     topBias: Bool = true) {
  let adjustedY = round(y) + (topBias ? -0.5 : 0.5)
  let line = makeLine(at: adjustedY, in: rect)
  strokePath(line, width: 1.0)
}

func makeLine(at y: CGFloat,
              in rect: CGRect) -> UIBezierPath {
  precondition((rect.minY...rect.maxY).contains(y))
  let line = UIBezierPath()
  line.move(to: CGPoint(x: rect.minX, y: y))
  line.addLine(to: CGPoint(x: rect.maxX, y: y))
  return line
}

func strokePath(_ path: UIBezierPath,
                width: CGFloat) {
  path.lineWidth = width
  UIColor.blue().setStroke()
  path.stroke()
}
Sadly, we don’t want to draw perfect single point lines. We want to draw perfect single pixel lines. On non-retina devices, those are the same thing. But on everything else, each point is made up of several pixels. “Plus” model iPhones, for example, actually have three pixels per point, represented by the yellow lines here:
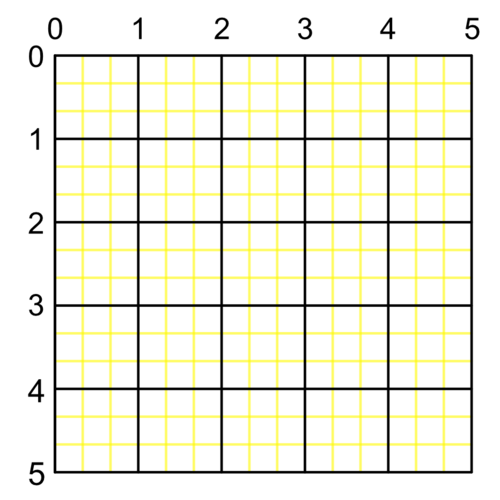
So rather than drawing between the black point-lines of our previous illustrations, we want to draw between the yellow pixel-lines:
Which will give us a line at Y = 1.8333 or Y = 2.1666, depending on the bias:

That means we can’t use our simple round() function anymore (as it only rounds to whole numbers). We have to write our own function that rounds up or down to the nearest fraction depending on the bias we give it:
func round(from: CGFloat,
           fraction: CGFloat,
           down: Bool = true) -> CGFloat {
  let expanded = from / fraction
  let rounded = (down ? floor : ceil)(expanded)
  return rounded * fraction
}
Then we just need to know what fraction of a point represents a pixel. We do this using the scale of our main screen:
var pixelUnit: CGFloat  {
  return 1.0 / UIScreen.main().scale
}
Then we can draw a pixel-thick line rounded to the nearest pixel instead of the nearest point:
//So close...
func almostSinglePixelLine(at y: CGFloat,
                           in rect: CGRect,
                           topBias: Bool = true) {
  let adjustedY = round(from: y,
                        fraction: pixelUnit,
                        down: topBias)
  let line = makeLine(at: adjustedY, in: rect)
  strokePath(line, width: pixelUnit)
}
Which is really close to what we want. But this rounds us to the nearest fraction of a point corresponding to a pixel. Or, to put it another way, it snaps us to the yellow lines in our illustration, which actually run between pixels:
If we want to avoid the anti-aliasing shown here, we need to snap to the exact middle of the pixel. That is, halfway between the yellow lines.
One way to do this would be to add ½ of our pixelUnit to our rounded value:
let offset = pixelUnit/2.0
let adjustedY = round(from: y,
                      fraction: pixelUnit,
                      down: topBias) + offset
which puts us right in the middle of our pixels, like we want. But it shifts both our lines down below Y = 2.
We really want our top-biased line to be just above 2 and our bottom-biased line to be just below it.
To compensate, we subtract offset from our y before rounding:
func singlePixelLine(at y: CGFloat,
                     in rect: CGRect,
                     topBias: Bool = true) {
  let offset = pixelUnit/2.0
  let adjustedY = round(from: y - offset,
                        fraction: pixelUnit,
                        down: topBias) + offset
  let line = makeLine(at: adjustedY, in: rect)
  strokePath(line, width: pixelUnit)
}
And there we have it. Pixel-perfect hairlines on either side of Y = 2 (depending on the topBias param).
Here’s a gist of all of this put together. Keep in mind the structure has been chosen for maximum readability, not because having a bunch of free functions hanging around for drawing lines is a good idea :)
A higher-order function is simply a function that takes another function as an argument.1 Swift uses HOFs all over the place. In fact, it considers the practice important enough to warrant language-level feature support in the form of trailing closure syntax:
// Takes a function as «completion» argument
func foo(with: String, completion: ()->Void) {...}
foo("bar") {
  // trailing closure syntax let's us create that
  // funcion in-line with a closure, packages it up
  // and passes it in as «completion».
}
But the pervasive use of trailing closure syntax in Swift can lead us to believe that, when a parameter has a function type, we have to pass it a closure. Not true! In Swift, functions are first-class citizens. We can use a function, itself, anywhere we might otherwise use a closure or variable.
For example, to sum an array of numbers, we might be tempted to give the implementation in a trailing closure like so:
[1,2,3,4,5].reduce(0) { $0 + $1 } //> 15
This is just a fancy way of writing:
[1,2,3,4,5].reduce(0, combine: { a, b in
  return a + b
})
Looking at it this way, it’s clear all we’re really doing is passing the combine parameter an ad-hoc closure that takes two arguments and sums them together. But do we need to create an inline closure for this? There’s already an existing function that takes two arguments and sums them together. It’s called +. We should just use that:
[1,2,3,4,5].reduce(0, combine: +) //> 15
Treating functions as first-class citizens extends well beyond just passing them as parameters. We can assign them to variables:
floor(5.12345) //> 5
let myFunc: (Double)->Double = floor
myFunc(5.12345) //> 5
We can conditionally assign functions:
let roundUp = true
let myFunc: (Double)->Double = roundUp ? ceil : floor
myFunc(5.12345) //> 6
And, in fact, we don’t even need to assign functions to a variable to use them:
let roundUp = true
(roundUp ? ceil : floor)(5.12345) //> 6
Which is pretty cool. Anytime we use functions directly instead of wrapping them in closures or other forms of indirection, we increase the declarativeness of our code.
1: AKA a procedural parameter, which I am motivated to mention only owing to my love of alliteration.↩︎
For whatever reason, working from throws → functors → monads → Result → Promise in the context of async error handling really made the whole concept click for me. YMMV, but I really value these ground-up pattern exposés Olivier Halligon does.
subscribe via RSS